🏫 [CS50x 2025] 0 Basic Concepts
🌟 Compression Software - How It Works
Compression software removes or reduces unnecessary data while keeping the important parts so that the image still looks nice and clear. But it’s a little more sophisticated than just deleting “extra dots.”
🔥 There are two main types of compression:
- Lossless Compression
- Lossy Compression
1. 🔒 Lossless Compression (No Data Lost)
- This method compresses the image without losing any quality or detail.
- It works by finding patterns and redundancies within the data and storing them more efficiently.
- Example: ZIP, PNG (Portable Network Graphics)
- 📸 When you open the compressed file, you get back the exact same image as the original. No quality loss, just a smaller file size.
Example of how it works:
Imagine you have an image with a big blue sky. Instead of storing blue, blue, blue, blue... for each pixel, the software can just say 1000x blue. It’s like shorthand!
2. ✂️ Lossy Compression (Some Data Lost, But Looks Good)
- This is the type where the picture still looks good but the file size is way smaller.
- It removes bits of data that are considered less important-like tiny color details or parts the human eye wouldn’t notice much.
- Example: JPEG, MP3, MP4 (yeah, it applies to music and videos too!)
- 📸 When you open the compressed file, you don’t get the exact original. But if done well, your eyes won’t even notice the difference.
How it works:
- It analyzes the image and decides what parts are most important.
- It might smooth out areas that are all the same color, or merge tiny variations in shades that aren’t noticeable.
- It may simplify complex textures or shapes that are too detailed for your eye to catch anyway.
🌈 Why Pictures Still Look Good After Compression:
- Human Vision Limitations: Your eyes can’t see super fine details or subtle color changes, so compression algorithms take advantage of that.
- Smart Algorithms: Things like JPEG compression use techniques like Discrete Cosine Transform (DCT) to split an image into parts and simplify it without making it look bad.
- Balancing Act: The software finds a sweet spot between quality and file size. More compression = lower quality, but still looks good at a reasonable level.
🔥 What “Patterns” Really Means
When they say “finding patterns” in the context of compression, it’s not exactly the same as just “ways or styles”. It’s more about finding repeated or predictable structures within data-things that can be simplified or represented more efficiently.
So, in compression, “patterns” means:
- Repetitions - Things that appear over and over.
- Similarities - Parts of the image that are alike or follow a consistent structure.
- Predictable structures - Areas that follow a certain rule or format.
🌟 Examples of Patterns in Pictures
- Repeated Colors:
- If you have a big sky in a photo that’s all the same shade of blue, it’s a huge pattern.
- Instead of storing
blue, blue, blue, blue...for every single pixel, compression can just store “1000 pixels of blue.”
- Smooth Gradients:
- When colors gradually change from one to another (like a sunset), that gradual shift is a pattern.
- The compression software can use math to approximate the gradient rather than store every single pixel’s color. This is what lossy compression like JPEG is great at.
- Repeating Textures:
- Think about a brick wall or grass. Even though it looks detailed, it’s actually made up of repeating units.
- Compression can simplify those repeating units into a smaller representation.
- Symmetry and Predictable Shapes:
- When there’s symmetry or predictable shapes (like a checkerboard pattern or repeating logo), compression can encode the pattern itself rather than each individual block.
🧩 Why Patterns Matter for Compression
- By finding these patterns, the software can store them in a simpler way instead of saving every single detail.
- It’s like writing a shortcut instead of repeating the same thing over and over.
For example, instead of storing:
1
1111111111 (10 pixels of white)
It can just store:
1
10x1 (which means 10 pixels of 1, way shorter!)
This trick is called Run-Length Encoding (RLE), a basic type of compression.
🌟 Why the professor called the output a “side effect”:
It’s actually a programming concept. And it’s important to understand, especially as you get deeper into coding.
🔥 What’s a “Side Effect” in Programming?
In programming, a “side effect” is when a function or block of code does something beyond just returning a value. It changes something in the environment or produces some visible effect, like printing text or modifying a file.
📌 Examples of Side Effects:
- Printing something to the screen:
1
print("Hello, World!")  # This is a side effect because it changes what you see on the screen.
- Changing a global variable:
1
2
3
4
5
count = 0

def increment():
    global count
    count += 1
When
increment()is called, it changescount, which is outside the function itself. That’s a side effect! - Writing to a file or changing a database:
1
2
with open("hello.txt", "w") as file:
    file.write("You are amazing!")
It modifies a file on your computer-totally a side effect!
🌟 Why It’s Called a “Side Effect” Instead of a “Direct Effect”
The term “side effect” comes from Functional Programming, where functions are supposed to be pure. Meaning:
- They take inputs and return outputs without changing anything outside of themselves.
- If a function prints something, changes a variable, or modifies a file, it’s considered a “side effect” because it affects something outside the function’s own little world.
💡 Imagine a hacker writing a script-if the script just returns a number, that’s pure. But if it changes files or sends messages across a network? Those are side effects. And hackers love side effects.
🌟 Why Does the Sprite Turn 180 Degrees?
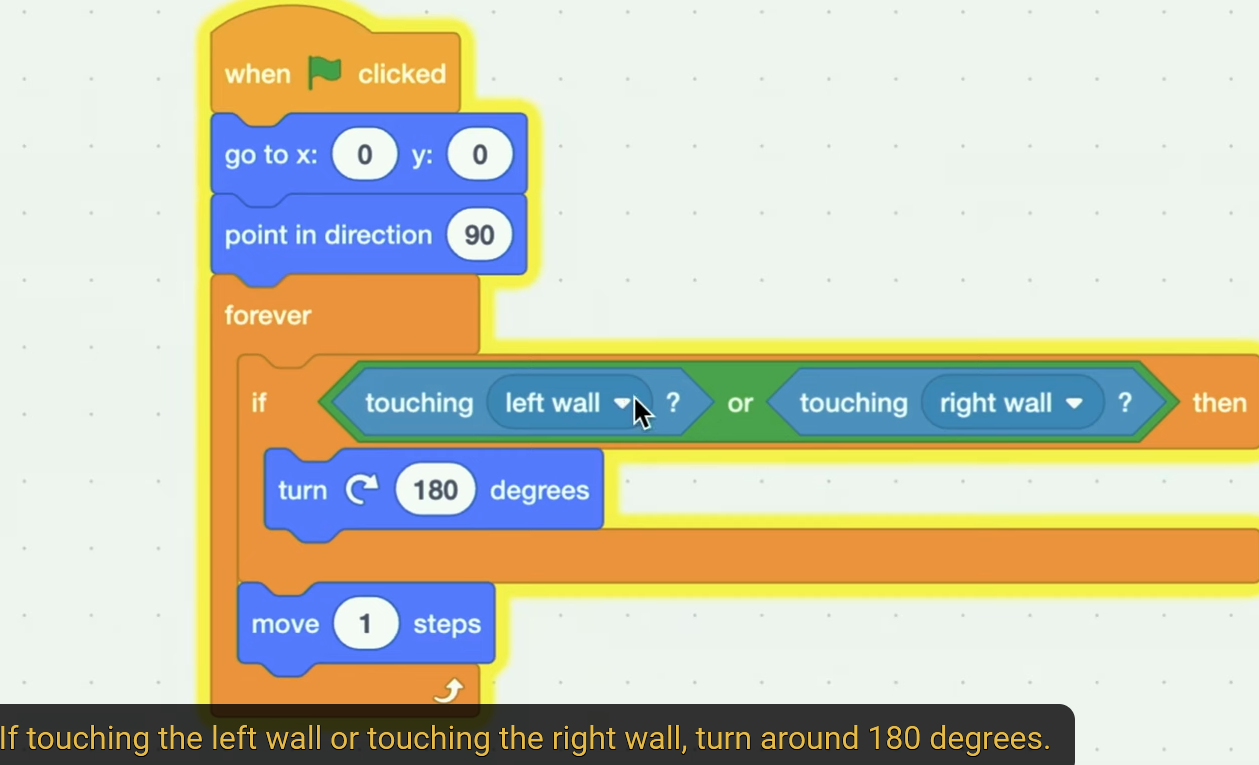
The Yale sprite (or any sprite in Scratch) needs to turn 180 degrees because it’s bouncing off the wall.
🔥 Here’s why:
- The sprite is moving in one direction (let’s say to the right).
- If it touches the right wall, it needs to turn around and go the opposite direction (to the left).
- Similarly, if it’s moving left and touches the left wall, it needs to turn around and go to the right.
- The most straightforward way to reverse direction is to turn 180 degrees-a complete about-face.
💡 Think of It Like This:
- Imagine you’re walking straight and you bump into a wall. You don’t just slide along the wall or turn slightly-you completely turn around and walk the other way.
- That’s exactly what the sprite does:
- Hits the wall → Flips direction by 180 degrees → Keeps moving.
🌀 Why Not Just Turn 90 Degrees?
- If the sprite only turned 90 degrees, it would move along the wall rather than bouncing back.
- The point of the 180-degree turn is to reverse the direction completely.
🔥 There’s a difference between:
- Flipping the Direction (Rotating the Direction) ✅
- Flipping the Sprite Itself (Upside Down) ❌
🌟 What’s Happening Here (Rotating the Direction):
- When you tell the sprite to “turn 180 degrees” in Scratch, you’re just changing the direction it’s moving, NOT flipping its appearance.
- Think of it like an invisible arrow pointing the way the sprite is traveling. That arrow is just being flipped around.
Example:
- If the sprite was moving right (direction = 90 degrees), turning it 180 degrees would make it move left (direction = -90 or 270 degrees).
- The sprite itself looks exactly the same-no upside-down madness. 🙃
🌟 Flipping the Sprite Itself (Upside Down):
- This would mean literally flipping the image like it was rotated by 180 degrees visually.
- Imagine if your sprite is a little cat 🐱-doing a visual flip would make the cat look like it’s upside down.
- Scratch usually doesn’t do this unless you specifically ask it to. In most cases, it just changes the direction of motion without altering how the sprite looks.
💡 How Scratch Handles It:
- In Scratch, sprites have a setting called “Rotation Style.”
- “All Around” - Allows full rotation (this is where your sprite might flip upside down if not careful).
- “Left-Right” - Only mirrors left or right, not upside down.
- “Don’t Rotate” - Sprite always faces the same way but moves in different directions.
- Your sprite is probably set to “Left-Right”, which means turning 180 degrees just makes it move the opposite way without changing the appearance.
🌟 Difference Between the Two Blocks
These two Scratch blocks are almost doing the same thing, but there’s a key difference in how they output the result.
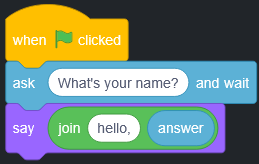
🔥 First Image (Using “say” block)
- Block Used:
say - Output Type: Visual Text (Speech Bubble)
- What It Does:
- When you run the script, it asks the user for their name.
- After the user answers, the sprite displays “Hello, [Name]” as text in a speech bubble on the screen.
- Where It Shows: On the screen, visible to the user.
- Use Case: Good when you want visual interaction but not actual sound.
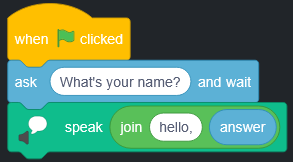
🔥 Second Image (Using “speak” block)
- Block Used:
speak - Output Type: Audio Output (Computer-generated voice)
- What It Does:
- When you run the script, it asks the user for their name.
- After the user answers, the sprite speaks aloud “Hello, [Name]” using the computer’s text-to-speech feature.
- Where It Shows: You hear it, but you don’t see it visually.
- Use Case: Perfect when you want to make your sprite talk or add a voice element to your project.
🔑 The Point Is:
- “Say” = Visual Output (speech bubble, like a text message).
- “Speak” = Audio Output (actual voice, like it’s talking to you).
Both are useful depending on what you’re trying to build. 😊 If you’re making a text-based adventure game, the say block is cool. But if you want to make something feel alive or interactive, using speak makes it way more fun. 🎤✨
🌟 What “Point in direction 90” Means
In Scratch, when you set a direction using a number, it’s based on a coordinate system where directions are represented by angles. 📐
🔥 Direction Numbers in Scratch:
- 0° → Up (Straight up, north) ⬆️
- 90° → Right (Straight to the right, east) ➡️
- 180° → Down (Straight down, south) ⬇️
- -90° or 270° → Left (Straight to the left, west) ⬅️
So, when you write:
point in direction 90
You are telling the sprite to face and move to the right. ➡️
💡 Why It’s Important in Your Code:
- “Point in direction 90” is setting the sprite’s initial direction to the right.
- So, when you start the script, your sprite will begin by moving to the right until it hits a wall.
- After it hits a wall, it flips 180 degrees and moves in the opposite direction (left).
- If it hits the left wall, it flips 180 degrees and heads right again.
It’s all about making sure the sprite starts moving in the intended direction. If you changed it to 0 instead, it would start moving up instead of right. 🚀